Previous classes have consisted of "Exploring Web Design", which covered a lot of general information regarding the history of the internet, the browser wars, and graphics design along with their design elements and principles. this introductory class gave insight on the underlying fundamentals of design and gave insight to understanding what it is that you see when browsing sites on the internet.
The second installment came in the form of "HTML 101", a class that introduced the basics of the hypertext markup language and how it can be utilized to create simple webpages through working examples. At that time Cascading style Sheets where not necessarily treated as an afterthought but it was planned to set it aside for another class, so to not overwhelm the student. Unfortunately, in the meanwhile, CSS had evolved to another standard (CSS3) along with many other developments. Although the information served its purpose it now seems almost antiquated in the advent of HTML 5 and Responsive Design. Nevertheless, it still provides the necessary tools to understanding the fundamental mechanics of HTML itself, which will then lend to a greater appreciation for Cascading style Sheets (CSS).
This class will bridge the gap between the last installment, which left off with HTML standard 3.2/4.01 and start with a brief review of key points of the older standard along with the introduction of Cascading Style Sheets. The main focus of this class will be on the HTML5 standard along with CSS3 and Responsive Design. JavaScript along with multimedia, transitions and other elements integral to interactive and dynamic design will also be covered.
If you paid attention in the previous installments you will be alright but a warning to the weary this class is not recommended for those who are not yet proficient with HTML or are not ready to commit to studying this subject. There will be a lot of material covered in a classroom setting but you will also have to scrutinize and digest a lot of it on your own time.
One unique aspect of the lessons in HTML 201 is the use of the W3 Schools' developed "Try-it Editor". This tool will allow the student to virtually see the result of assembled code on the fly without going through the motions of creating files in a text editor, saving it and then opening it in a browser to view it (as was done in HTML 101). Therefore it will be imperative for you to make yourself familiar with document structure and and use of certain elements such as inline styles and inline scripts. Lack of the aforementioned can and will create situations in which you will attempt to enter code into the "Try-it Editor" and clicking on "View Results" will get you nothing but a blank screen or gibberish while you wait and expect for something else to happen.
The greater part of the material for this class was provided by "W3 Schools.com", a provider of online certification programs and self proclaimed "World's Largest Web Developer Site". Adaption of this material for this environment required the localization of all of the external reference material and interactive examples. There is still quite a lot of material that had to be left on the table because it could not be made accessible within the constraints of reasonable time and effort. Nevertheless, the information that is provided is current and up to date and will allow you a definitive glimpse into the complexities of modern web design.
HTML can be edited by using professional HTML editors like:
However, for learning HTML it is recommended that simple a text editor like Notepad (PC) or TextEdit (Mac) be used.
It has been proven that using a simple text editor is the best way to learn HTML.
Follow the 4 steps below to create your first web page with Notepad.
To open Notepad in Windows:
Click Start (bottom left on your screen). Click All Programs. Click Accessories. Click Notepad.
To open Notepad in Windows 8 or later:
Open the Start Screen (the window symbol at the bottom left on your screen). Type Notepad.
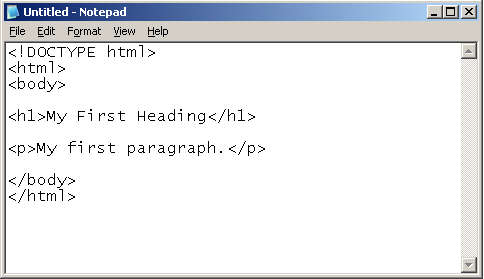
Write or copy some HTML into Notepad.
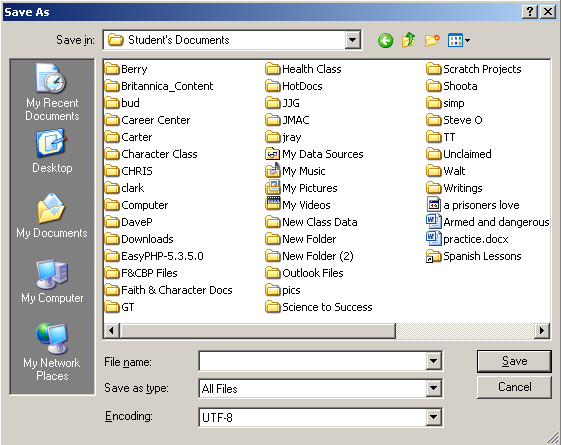
Save the file on your computer.
Select File > Save as in the Notepad menu.
Name the file "index.html" or any other name ending with html or htm.
UTF-8 is the preferred encoding for HTML files.
ANSI encoding covers US and Western European characters only.
 |
You can use either .htm or .html as file extension. There is no difference, it is up to you. |
|---|
Open the saved HTML file in your favorite browser. The result will look much like this:

|
To open a file in a browser, double click on the file, or right-click, and choose open with. |
|---|
Don't worry if these examples use tags you have not learned.
You will learn about them in the near future.
All HTML documents must start with a document-type-declaration (DTD): <!DOCTYPE html>.
The HTML document itself begins with <html> and ends with </html>.
The visible part of the HTML document is between <body> and </body>.
HTML headings are defined with the <h1> to <h6> tags:
HTML paragraphs are defined with the <p> tag:
HTML links are defined with the <a> tag which designates an anchor:
The link's actual destination is specified in the hyperlink reference href attribute.
Attributes are used to provide additional information about HTML elements.
HTML images are defined with the <img> tag.
The source file (src), alternative text (alt), and size (width and height) are provided as attributes:
|
You will learn more about attributes as you continue. |
|---|
HTML also defines special elements, for defining text with a special meaning.
HTML uses elements like <b> and <i> for formatting output, like bold or italic text.
Formatting elements were designed to display special types of text:
The HTML <b> element defines bold text, without any extra importance.
The HTML <strong> element defines strong text, with added semantic "strong" importance.
The HTML <i> element defines italic text, without any extra importance.
The HTML <em> element defines emphasized text, with added semantic importance.
|
Browsers display <strong> as <b>, and <em> as <i>. However, there is a difference in the meaning of these tags:<b> and <i> defines bold and italic text, but <strong> and <em> means that the text is "important". |
|---|
The HTML <small> element defines small text:
The HTML <mark> element defines marked or highlighted text:
The HTML <del> element defines deleted (removed) text.
The HTML <ins> element defines inserted (added) text.
The HTML <sub> element defines subscripted text.
The HTML <sup> element defines superscripted text.
| Tag | Description |
|---|---|
| <b> | Defines bold text |
| <em> | Defines emphasized text |
| <i> | Defines italic text |
| <small> | Defines smaller text |
| <strong> | Defines important text |
| <sub> | Defines subscripted text |
| <sup> | Defines superscripted text |
| <ins> | Defines inserted text |
| <del> | Defines deleted text |
| <mark> | Defines marked/highlighted text |
CSS stands for Cascading Style Sheets
Styling can be added to HTML elements in 3 ways:
The most common way to add styling, is to keep the styles in separate CSS files. But, in this tutorial, we use internal styling, because it is easier to demonstrate, and easier for you to try it yourself.
|
You can learn much more about CSS in our CSS Tutorial. |
|---|
CSS styling has the following syntax:
The element is an HTML element name. The property is a CSS property. The value is a CSS value.
Multiple styles are separated with semicolon.
Inline styling is useful for applying a unique style to a single HTML element:
Inline styling uses the style attribute.
this inline styling changes the text color of a single heading:
An internal style sheet can be used to define a common style for all HTML elements on a page.
Internal styling is defined in the <head> section of an HTML page, using a <style> element:
External style sheet are ideal when the style is applied to many pages.
With external style sheets, you can change the look of an entire web site by changing one file.
External styles are defined in an external CSS file, and then linked to in the <head> section of an HTML page:
The CSS color property defines the text color to be used for the HTML element.
The CSS font-family property defines the font to be used for the HTML element.
The CSS font-size property defines the text size to be used for the HTML element.
Every HTML element has a box around it, even if you cannot see it.
The CSS border property defines a visible border around an HTML element:
NOTE: Make sure that you understand the proper document structure of an HTML page. The following example is a decleration that would be used in internal styling, intended for use in a style block. In order to use it here without just ending up with text appearing in the tryit Editor, you must enclose the example with <style>...</style> tags to create a style block and then actually use the element (<p>...</p>) you are intending to define in order to see the style applied.
The CSS padding property defines a padding (space) inside the border:
The CSS margin property defines a margin (space) outside the border:
|
the CSS examples above use px to define sizes in pixels. |
|---|
All the examples above use CSS to style HTML elements in a general way.
To define a special style for one special element, first add an id attribute to the element:
Then define a different style for the (identified) element: (create a style block for this id)
To define a style for a special type (class) of elements, add a class attribute to the element:
Now you can define a different style for all elements with the specified class: (create a style block for this class)
|
Use id to address single elements. Use class to address groups of elements. |
|---|
In older HTML versions, several tags and attributes were used to style documents.
These tags and attributes are not supported in HTML5!
Avoid using the <font>, <center>, and <strike> elements.
Avoid using the color and bgcolor attributes.
| Tag | Description |
|---|---|
| <style> | Defines style information for a document |
| <link> | Defines a link between a document and an external resource |
Websites often display content in multiple columns (like a magazine or newspaper).
London is the capital city of England. It is the most populous city in the United Kingdom, with a metropolitan area of over 13 million inhabitants.
Standing on the River Thames, London has been a major settlement for two millennia, its history going back to its founding by the Romans, who named it Londinium.
|
The <div> element is often used as a layout tool, because it can easily be positioned with CSS. |
|---|
This example uses four <div> elements to create a multiple column layout:
To get the full effect of the layout example shown, combine the CSS style block with the HTML from above in the try-it editor.
Try it yourself »HTML5 offers new semantic elements that define different parts of a web page:

|
|
This example uses <header>, <nav>, <section>, and <footer> to create a multiple column layout:
|
Note the difference in the way the divisions were defined between the traditional and the HTML5 examples. |
|---|
|
The <table> element was not designed to be a layout tool. The purpose of the <table> element is to display tabular data. |
|---|
Layout can be achieved using the <table> element, because table elements can be styled with CSS:
|
Warning: Creating layout with tables is not wrong, but it is not recommended! Avoid tables for creating layout. |
|---|
An iframe is used to display a web page within a web page.
The syntax for adding an iframe is:
The src attribute specifies the URL (web address) of the iframe page.
Use the height and width attributes to specify the size.
The attribute values are specified in pixels by default, but they can also be in percent (like "80%").
By default, an iframe has a black border around it.
To remove the border, add the style attribute and use the CSS border property:
With CSS, you can also change the size, style and color of the iframe's border:
An iframe can be used as the target frame for a link.
The target attribute of the link must refer to the name attribute of the iframe:
| Tag | Description |
|---|---|
| <iframe> | Defines an inline frame |
The <head> element is a container for metadata (data about data).
HTML metadata is data about the HTML document. Metadata is not displayed.
Metadata typically define document title, styles, links, scripts, and other meta information.
The following tags describe metadata: <title>, <style>, <meta>, <link>, <script>, and <base>.
In the HTML5 standard, the <html> tag, the <body> tag, and the <head> tag can be omitted.
The following code will validate as HTML5:
|
Omitting the <html> and <body> tags is not recommended since it has the potential of causing problems with compatibility and functionality. |
|---|
The <html> element is the document root. It is the recommended place for specifying the page language:
Declaring a language is important for accessibility applications (screen readers) and search engines.
Omitting <html> and <body> can crash badly-written DOM/XML software.
Finally, omitting <body> can produce errors in older browsers (IE9).
In the HTML5 standard, the <head> tag can also be omitted.
By default, browsers will add all elements before <body>, to a default <head> element.
You can reduce the complexity of HTML, by omitting the <head> tag:
|
Omitting tags is unfamiliar to web developers, especially when the
absence of them create a loss of designed functionality. The omission of tags is served best for laymen who produce sites that are not complex. Regardless it will still take time to be
established as a guideline. |
|---|
The <title> element defines the title of the document.
The <title> element is required in all HTML/XHTML documents.
The <title> element:
A simplified HTML document:
The <style> element is used to define style information for an HTML document.
Inside the <style> element you specify how HTML elements should render in a browser:
The <link> element defines the page relationship to an external resource.
The <link> element is most often used to link to style sheets:
The <meta> element is used to specify page description, keywords, author, and other metadata.
Metadata is used by browsers (how to display content), by search engines (keywords), and other web services.
Define keywords for search engines:
Define a description of your web page:
Define the character set used:
Define the author of a page:
Refresh document every 30 seconds:
Example of <meta> tags:
The <script> element is used to define client-side JavaScripts.
The script below writes Hello JavaScript! into an HTML element with id="demo":
|
You will find more information on the power of JavaScript as you progress thorough this material. To learn about JavaScript, visit the JavaScript Tutorial! |
|---|
The <base> element specifies the base URL and base target for all relative URLs in a page:
| Tag | Description |
|---|---|
| <head> | Defines information about the document |
| <title> | Defines the title of a document |
| <base> | Defines a default address or a default target for all links on a page |
| <link> | Defines the relationship between a document and an external resource |
| <meta> | Defines metadata about an HTML document |
| <script> | Defines a client-side script |
| <style> | Defines style information for a document |
Reserved characters in HTML must be replaced with character entities.
Characters, not present on your keyboard, can also be replaced by entities.
Some characters are reserved in HTML.
If you use the less than (<) or greater than (>) signs in your text, the browser might mix them with tags.
Character entities are used to display reserved characters in HTML.
A character entity looks like this:
OR
& #entity_number;To display a less than sign we must write: <or <
|
The advantage of using an entity name, instead of a number, is that
the name is easier to remember. The disadvantage is that browsers may not support all entity names, but the support for numbers is good. |
|---|
A common character entity used in HTML is the non-breaking space ( ).
Remember that browsers will always truncate spaces in HTML pages. If you write 10 spaces in your text, the browser will remove 9 of them. To add real spaces to your text, you can use the character entity.
| Result | Description | Entity Name | Entity Number |
|---|---|---|---|
| non-breaking space | |   | |
| < | less than | < | < |
| > | greater than | > | > |
| & | ampersand | & | & |
| ¢ | cent | ¢ | ¢ |
| £ | pound | £ | £ |
| ¥ | yen | ¥ | ¥ |
| € | euro | € | € |
| © | copyright | © | © |
| ® | registered trademark | ® | ® |
|
Entity names are case sensitive. |
|---|
A diacritical mark is a "glyph" added to a letter.
Some diacritical marks, like grave ( ̀) and acute ( ́) are called accents.
Diacritical marks can appear both above and below a letter, inside a letter, and between two letters.
Diacritical marks can be used in combination with alphanumeric characters, to produce a character that is not present in the character set (encoding) used in the page.
Here are some examples:
| Mark | Character | Construct | Result |
|---|---|---|---|
| ̀ | a | à | à |
| ́ | a | á | á |
| ̂ | a | â | â |
| ̃ | a | ã | ã |
| ̀ | O | Ò | Ò |
| ́ | O | Ó | Ó |
| ̂ | O | Ô | Ô |
| ̃ | O | Õ | Õ |
You will see more HTML symbols in the next chapter of this tutorial.
XHTML is HTML written as XML.
Many pages on the internet contain "bad" HTML.
this HTML code works fine in most browsers (even if it does not follow the HTML rules):
Today's market consists of different browser technologies. Some browsers run on computers, and some browsers run on mobile phones or other small devices. Smaller devices often lack the resources or power to interpret "bad" markup.
XML is a markup language where documents must be marked up correctly (be "well-formed").
By combining the strengths of HTML and XML, XHTML was developed.
XHTML is HTML redesigned as XML.
An XHTML document must have an XHTML DOCTYPE declaration.
A complete list of all the XHTML Doctypes is found in the HTML Tags Reference.
The <html>, <head>, <title>, and <body> elements must also be present, and the xmlns attribute in <html> must specify the xml namespace for the document.
this example shows an XHTML document with a minimum of required tags:
In HTML, some elements can be improperly nested within each other, like this:
In XHTML, all elements must be properly nested within each other, like this:
this is wrong:
this is correct:
this is wrong:
this is correct:
this is wrong:
this is correct:
this is wrong:
this is correct:
this is wrong:
this is correct:
Wrong:
Correct:
Wrong:
Correct: