×
About Lessons HTML Reference F&CBP Home Class Schedule


XX. Tables

Let's set the table...
...and completely arrange ordinary web pages into orderly columns and rows.

Objectives

After this lesson you will be able to:

Lesson

Another piece of history, tables were introduced into HTML 3.0 and further enhanced by Netscape to add another dimension to web page design. They provide a structure for organizing other HTML elements into "grids" or "cells" on the page. One of the more obvious uses of tables is when you have to format... columnar tables of text! But, tables also open up the door for many other page layout options. Be prepared, there is a lot of stuff to do in this lesson, along with going back and reviewing some of the previous material. So fasten your seatbelt and enjoy the ride.

The HTML for tables can look very complex -- but you will start simple and build up some tables for your Favorite Cars Web lesson.

For starters, keep in mind this concept:

Tables are built starting from the top left, then across the columns of the first row, then to the second row, across the columns of the second row, etc...

Natural Order of Movement
1- >>>>>>>> 2- >>>>>>>> 3- >>>>>>>>
4- >>>>>>>> 5- >>>>>>>> 6- >>>>>>>>

Each grid in a table is called a cell so if you are familiar with Microsoft Excel or other spreadsheets the terminology will sound similar.

Basic Table Tags

Examples of the HTML for the basic table structure is shown below:

Example

Table HTML

<table border="1">
<tr>
<td>Row 1 col 1</td>
<td>Row 1 col 2</td>
<td>Row 1 col 3</td>
</tr>
<tr>
<td>Row 2 col 1</td>
<td>Row 2 col 2</td>
<td>Row 2 col 3</td>
</tr>
<tr>
<td>Row 3 col 1</td>
<td>Row 3 col 2</td>
<td>Row 3 col 3</td>
</tr>
</table>

Sample Result

table (64K)

The {border="1" } attribute in the <table> tag instructs the browser to draw a line around the table with a thickness of 1 pixel. Note how each row is defined by Table Row tags <tr>...</tr> and then cells in each row are defined by Table Data <td>...</td> tags. Each <td>...</td> tag can contain any type of HTML tag we have used in this tutorial -- headers, styled text, hypertext links, inline graphics, etc. Within this tag you can uses several attributes to control the alignment of items in a single cell:
HORIZONTAL ALIGNMENT VERTICAL ALIGNMENT
<td align=left> aligns all elements to the left side of the cell (this is the default setting) <td valign=top> aligns all elements to the top of the cell
<td align=right> aligns all elements to the right side of the cell <td valign=bottom> aligns all elements to the bottom of the cell
<td align=center> aligns all elements to center of the cell <td valign=middle> aligns all elements to the middle of the cell (this is the default setting)
One important point to remember is that just like with some of the other items discussed previously, the migration of the presentation portions of a web page to CSS is affecting things like table-border settings in this case. What you will find in this and some of the following lessons is that the older methods must be shown to allow you to see attributes that can be adjusted and how they affect the way a table or other subject matter will be presented before becoming versed with CSS.

These attributes may be combined:

<td align=left valign=bottom>

This HTML will produce a cell with items aligned along the left and bottom of the cell.

Rows and Columns

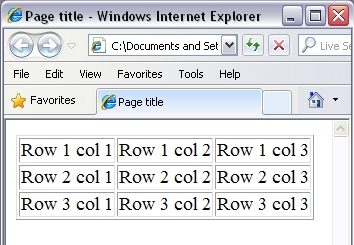
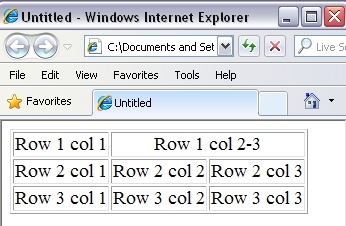
The table shown in the above sample is pretty simple and square -- three rows by three columns. Look what you can do if you use the colspan and rowspan attributes in the <td>...</td> tags.

Example

"colspan"

<table border>
<tr>
<td>Row 1 col 1</td>
<td align=center colspan="2">
Row 1 col 2-3</td>
</tr>
<tr>
<td>Row 2 col 1</td>
<td>Row 2 col 2</td>
<td>Row 2 col 3</td>
</tr>
<tr>
<td>Row 3 col 1</td>
<td>Row 3 col 2</td>
<td>Row 3 col 3</td>
</tr>
</table>

Sample Result

table3 (78K)

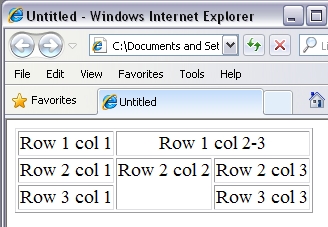
Okay, now that we have had a cell span two columns -- let's make a cell that spans two rows. Remember to follow the HTML as it builds from the top left across, then down, then across...

Example

"rowspan"

<table border="1">
<tr>
<td>Row 1 col 1</td>
<td align=center colspan="2">
Row 1 col 2-3</td>
</tr>
<tr>
<td>Row 2 col 1</td>
<td valign=top rowspan="2">
Row 2 col 2</td>
<td>Row 2 col 3</td>
</tr>
<tr>
<td>Row 3 col 1</td>
<td>Row 3 col 3</td>
</tr>
</table>

Sample Result

table (64K)

There is still quite a bit more to cover, but let's stop looking at these boring examples and work on your web page...

A Data Table

Your Introduction page doesn't have a lot of information on it, so we will now enhance that page using a table.

  1. Open up the intro.html file in your text editor.
  2. Find the spot after the centered paragraph containing the inline images of the three hypergraphics and before the last paragraph of text .
  3. In that spot you are going to place the following table:
  4. <table border>
     <tr>
      <th>Vehicle</th>
      <th>Body Style</th>
      <th>Price Range</th>
     </tr>
     <tr>
      <td align=center>Aston Martin DBS</td>
      <td align=center>2-Dr Coupé </td>
      <td align=center>$150k-$175k</td>
     </tr>
     <tr>
      <td align=center>Audi S6</td>
      <td align=center>4-Dr Sedan</td>
      <td align=center>$75k-$90k</td>
     </tr>
     <tr>
      <td align=center>BMW 550</td>
      <td align=center>4-Dr Sedan</td>
      <td align=center>$65k-$90k</td>
     </tr>
     <tr>
      <td align=center>Chevrolet Camaro</td>
      <td align=center>2-Dr Coupé</td>
      <td align=center>$30k-$75k</td>
     </tr>
     <tr>
      <td align=center>Dodge Charger</td>
      <td align=center>4-Dr Sedan</td>
      <td align=center>$35k-$65k</td>
     </tr>
     <tr>
      <td align=center>Ford Mustang</td>
      <td align=center>2-Dr Coupé</td>
      <td align=center>$30k-$70k</td>
     </tr>
     <tr>
      <td align=center>Ferrari 458</td>
      <td align=center>2-Dr Coupé</td>
      <td align=center>$175k-$225k</td>
     </tr>
     <tr>
      <td align=center>Porsche Panamera</td>
      <td align=center>5-Dr SUV</td>
      <td align=center>$68k-$125k</td>
     </tr>
    </table>
    NOTE: Look at the HTML for the first row. The Table Header tags <th>...</th> function exactly like the <td>...</td> tags except that any text is automatically made bold and all items are automatically centered. Also see that in the cells that contain the word "Coupé" you must use the HTML for the special characters to display the symbols for " é " (See lesson 10)
  5. While you are here , let's match a couple of things up and use this as a review of past lessons. Center the inline images that serve as hypergraphics and then center the table you just inserted.
  6. Completely remove the existing entire line that contained the color formatting
  7. (<BODY BGCOLOR=#XXXXXX TEXT=#XXXXXX LINK=#XXXXXX VLINK=#XXXXXX>)
  8. Now let's also change the background of this page to match the index.html page. I hope you can remember how.
  9. What you should have now is a white background with a gray checker pattern. The font color now has also reverted back to its default values. To view the browsers default text colors, for Internet Explorer > click on tools in the menu bar > choose internet options > look at the bottom of the dialogue box at the last row of buttons under "Appearance" > click on "Colors" > uncheck "Use Windows Colors". For Firefox > click on the menu icon on the right side of the menu bar > click options > content > (look to the right of "Fonts & Colors) and choose the "Colors" box. These are the browser's default text color values.
  10. Do not get lost and start playing with other settings while you are in the "Internet Options"/"Options" section, you could create some adverse effects!!
  11. Save and Load into your web browser. You can compare your attempt with this sample of how the table should look at this point.

Some browsers allow you to specify other settings for the lines that make up the table. These are the attributes for the table tag:
<table border=X cellpadding=Y cellspacing=Z>
where X is the width (in pixels) of the outer border of the table. The attribute cellpadding specifies how much empty "space" exists between items in the cells and the walls of the cells -- high values for Y will make the cells larger ("padding" the cell).

Remember the term "padding", it will be one of the components of the "standard box model" when you get to CSS.

NOTE: The definition of the CSS box model is the space a block-level element takes up in a layout is controlled by the values of the height, width, margins, padding, and border properties. The description of how these properties interact and how those calculations are made is called the box model.

The attribute cellspacing specifies (in pixels) the width between the inner lines that divide the cells. To see what effect these attributes have, see the examples on the table test page. Modify your <table> tag to read:

<table border=3 cellpadding=4 cellspacing=8>

Invisible or "Phantom" Tables

A table with borders is useful for charts and data but other times you may want to create a grid-like layout that does not have the borders. If you like, you can call these "phantom" tables because to the reader it may not be obvious that they are looking at a table! A phantom table is built in the same manner as the table you built above except the <table> tag contains a table border set for "0" or is omitted all together; this will allow you to create a table with invisible borders.

Another Data Table

Your International Market page doesn't have any information on it yet, so we will now enhance that page using a "Phantom" table.

  1. Open up the inter.html file in your text editor.
  2. Find the spot between the centered h2 heading "International Market" and the footer insert the following text:
  3. In that spot you are going to place the following text:
  4. <p>Most foreign car makers, although known for their upscale models, also began penetrating the lower-end market with entry-level cars. This was their way to introduce potential up and coming customers to their brands with an affordable entry-level model and then let them grow into the higher-end. The following is an example of how certain manufacturers have stretched their line-up. The following represents the two manufacturers 4-Door Sedans.</p>

    After you have entered the text add a phantom table using the following HTML:

    <div align="center">
    <table cellpadding="2" cellspacing="2">
     <tr>
      <td>
       <ul>
         <li><b>Mercedes-Benz</b></li>
         <li>CLA Class</li>
         <li>C Class</li>
         <li>E Class</li>
         <li>CLS Class</li>
         <li>S Class</li>
         <li><b>Audi</b></li>
         <li>A3/S3</li>
         <li>A4/S4/RS4</li>
         <li>A6/S6</li>
         <li>A7/S7/RS7</li>
         <li>A8/S8</li>
       </ul>
      </td>
     </tr>
    </table>
    </div>
    NOTE: In the above example you will notice one of the alternate ways to develop a table. Studying the source code, you will find the <tr> (table row) tag followed by the <td> (table data) tag. If you look closely you will notice that the table data has an unordered list embedded in it.

    What you have just done should look like this sample.

    Splitting a Long List

    Another handy use for invisible tables is to transform a long list of items (created with the list tags, see lesson 7). Lists grow downward on a page, and can waste valuable real estate on the right side of the page. The effect is to transform a list so that it will consist of multiple columns.

    You will now break up a the list of resources on your International Market page (inter.html) that you just entered.
    1. If it is not already, open your inter.html file in your text editor.
    2. Look for the <b>...</b> list items which represent the manufacturers, that is where you will split the list. You are going to modify the <td> and add "valign=top" as the attribute, so that it will read as follows:
    3. <td valign=top>
    4. The whole list should now consist of the following HTML:
    5. <center>
      <table cellpadding="2" cellspacing="2">
       <tr>
        <td valign=top>
         <ul>
          <li><b>Mercedes-Benz</b></li>
          <li>CLA Class</li>
          <li>C Class</li>
          <li>E Class</li>
          <li>CLS Class</li>
          <li>S Class</li>
         </ul>
        </td>
        <td valign=top>
         <ul>
          <li><b>Audi</b></li>
          <li>A3/S3</li>
          <li>A4/S4/RS4</li>
          <li>A6/S6</li>
          <li>A7/S7/RS7</li>
          <li>A8/S8</li>
         </ul>
        </td>
       </tr>
      </table>
      </center>
      NOTE: You simply have taken one long <ul>...</ul> list and broke it into two complete lists, each in the cell of an invisible table with one row and two columns.
    6. Save and Reload in your web browser. You can compare your attempt with this sample of how the table should look at this point.
    7. Now, go ahead and format this page to match your current index page. The same as you did for your introduction.html page.
    8. Save and Reload in your browser and let's see if your work matches the sample.

    Check Your Work

    Compare your web pages with the following samples of how they should appear. If your pages are different from the sample or the hypertext links do not work correctly, review the text you entered in the text editor. Tables quickly become complicated, so double-check that you have defined the rows and columns correctly.

    Review

    Review topics for this lesson:
    1. What is the order in which a web browser interprets the elements of a table tag?
    2. What is the difference between <td>...</td> and <th>...</th> tags?
    3. Where does the colspan=X attribute go? What does it do?
    4. How do you create a table that has no visible margins?

    Independent Practice

    Look at your own web pages and find a place where a table may give you a better page layout. Or, add a chart or list of data to your web pages and use a table to format it. Try creating a table with colored cells, or like we have done in this tutorial, use the colors on an invisible table to color blocks of areas on a web page.