
NOTE: The use of the following material, in the way described, is another one of those things that is obsolete. Although it is still used, it not used in the context shown. The information is still beneficial because you will find it familiar when you come across it in CSS later on.
Not only can you color the background but you can c o l o r , SIZE , and even change the font typeface for specific portions of text! How much is that worth to you? Can you see the potential? ...but WAIT, there's more! You can now write superscripts and subscripts for fun things like chemistry and math: CO2 + SO4-2 3x2 - 2y-1/2 = 4z
With the older tags introduced back in HTML 3.2, you had options for formatting your text. Specifically, you can create different sized text as well as different colored text. When used judiciously, the text formatting would enhance the layout of a web page but when used with reckless abandon, it would produce web pages that looked like a bunch of illegible noise.
You can also create superscript and subscripts which are used in mathematical expressions, chemical formulas, or as footnote markers.
NOTE: The inclusion of this section regarding the <font>..</font> tags in this tutorial, serve only as informative material on how font sizes are manipulated without CSS (Cascading Style Sheets). When using the HTML 4.01 strict or XHTML 1.0 strict DOCTYPES, the use of the font tags will put the browser into quirks mode and could cause unpredictable results!
This lesson will hesitantly introduce you to these text features with some examples that you will use to modify your Favorite Cars Web pages. The key thing to keep in mind is what was covered in the first "Exploring Web Design" Class regarding the concept of "Typography and Legibility". Just because you find yourself with a bunch of options, it doesn't mean that you have to use every one of them at the same time. If used judiciously they can add great emphasis and/or effect to your web pages.
This lesson is to familiarize yourself with the concept of dressing up your text and is not meant to be taken literally since the application will change dramatically when you are introduced to CSS.
The <font>..</font> tag is a way to scale your font sizes and may be used to set the size of the font from 1 (smallest) to 7 (largest) with a size of 3 being the normal text size according to the default font set in the browser:
Remember that the actual size will depend on the computer font the user has selected for their web browser -- you are adjusting the size relative to the default font they have chosen.
The format for the font size tag is:Where N=1 to 7. The font tag may be used in conjunction with other style tags (lesson 6) or inside header tags (lesson 4).
The other method for using the font tag is to provide a relative size change:This changes the base font size from its default value of 3, to another other value. You might do this in a web page that will mostly have text of a larger or smaller than standard font size. That way, if you need to adjust small portions of the page, you can use the relative font size tags shown above. The power of using relative font size tags (e.g. size=+2) over absolute size tags (e.g. size=5) is that we could easily shift the size of ALL text in that page by changing one instance of the <basefont> tag.
<basefont> tag has no closing tag -- it continues to be the base font size until another <basefont> tag occurs.In lesson 16, you were introduced to the tags for coloring text of the entire web page as well as the proper format for representing color values in HTML. You can also add an attribute to the tag to color a selected portion of text using the hexadecimal codes or the 16 colors recognized by their names:
<font color=red>...</font>We will not go crazy with the color tags, but as an example, we will change the color of the Favorite CARS text we worked on above for the cover page. If you recall, we set the text color for the text of this page to yellow and we will override that color just for the title text:
NOTE: The size and color attributes can reside together in a <font> tag. The effect here makes the word "CARS" a crimson color and one size larger than the previous word.
Until HTML 3.0 you were out of luck if you needed to write mathematical expressions, chemical formulas, or other expressions with superscripts and/or subscripts. These tags raise or lower the "scripted" text by 1/2 a line and sizes it one size smaller.
The HTML format for these tags is:<font> tag to specify a particular screen font for text display. The HTML tag for specifying a font face is:If a viewer's web browser supports the font FACE attribute and they have one of the listed fonts installed on their computer, then the text will be displayed with the specified font. Otherwise, it will use the same font as the rest of the web page.
If you choose to use a font face, you should select a face that is standard or be sure that the intended computers have any "exotic" fonts installed. You will now modify the <font> tag for our title page so that the words "Favorite Cars" appear in a different font:
NOTE: Included are the specifiers for the browser to choose Arial and then Helvetica if the other is unavailable. Use this HTML with discretion! You want to create a situation where you choose the primary font and then a similar substitute that is a common font installed on machines or else the browser will select one for you with very unpredictable results!
NOTE: Just to reiterate the point that font tags are obsolete! They became obsolete with the introduction of Cascading Style Sheets (CSS) which above and beyond HTML adds a powerful tool to creating web pages. There will be a brief introduction to CSS at the end of this tutorial to introduce you to another necessary tool for designing efficient and manageable web sites. The subject of CSS is so comprehensive that it should be a class on its own. Unfortunately it can't be taught with out the knowledge of HTML.In the next class (HTML 201) you will have the opportunity to become fully immersed and view the wonderful things that this powerful tool is capable of. It will also give you a full appreciation of its capabilities and leave you wondering how people have been making web pages without it.
CSS, short for Cascading Style Sheets, it is a language for describing the presentational properties of content elements in structured documents such as HTML documents.
Style sheets provide a set of guidelines for styling a structured document by defining rules for the appearance of different types of content or different contexts that content can be found in. You may have already encountered forms of style sheets or themes in typical offce suites or e-mail programs. It is common in presentation software such as PowerPoint to pick a theme to start with, where each slide is automatically formatted with the same font sizes, colors, and layouts, rather than starting with a blank slate and designing each slide individually and hoping for them to be consistent when you're done.
As a browser or other user agent loads the HTML content for the document, it also loads the style sheet information. From this style sheet information, it then builds up the set of presentation rules for each individual content item based on its element type, its state, and its location in the document. It will ultimately render each element consistently based on this accumulated set of rules.
Confused? This is just one more option for creating fancy dividers to mark the different sections of a web page.
NOTE: We will not be modifying our web pages in this lesson -- so you can just review the information and then decide if you want to experiment with it.
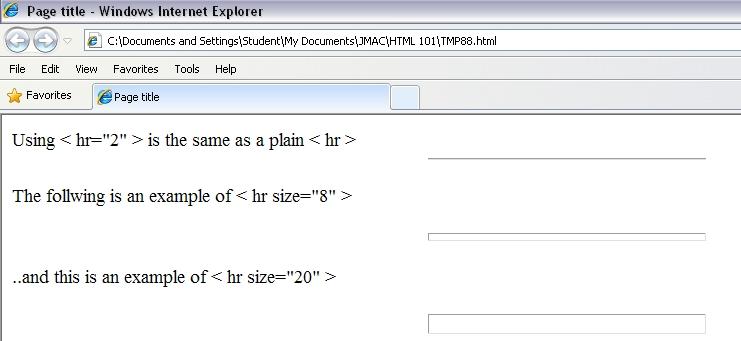
Another formatting option for the <hr> tag allows you to adjust the width of the line -- it does not necessarily have to stretch across the whole page. You can do this by using this format:
Where X is a number of pixels for the width and "Z" is the percentage of the current web page. In general it is to recommend use the percentage as it will adjust itself to the width of the browser window used by the person reading your pages (some out there will be viewing your page on a huge 55 in. HDTV, others on small 15" screens and some on even smaller platforms like their smartphones).
NOTE: Try stretching and/or shrinking the width of your web browser window (if available it is the setting located in the bottom right of the browser window; better known as the status bar) to see the difference between specifying the width in absolute pixels (width=80) compared to specifying the width in percentage of the web page (width=80%)
Finally, there may be a case where you do not want the 3D shading on the <hr> tag and just wish to use a standard filled line. It is as simple as adding the "noshade" attribute:
There is also an align attribute for the <hr> tag. When you specify a shorter width for a horizontal rule, you can also specify that it be aligned to the left or the right (the default is to center align horizontal rule lines):
<hr> tag?Experiment with some of the <hr> options in your own web pages.
Why just stay over to the left?
... when you can hang out in the middle?
or just hang out to the right?
As the web grew and grew and grew, there was demand for more control over page layout. One desire was to format text that was aligned to the center of a page, rather than just justified to the left margin.
For the effect of center align compare the following two examples, the first displays the page in a default right aligned form. The next example is with all element centered and using the <center>...</center> tag to center align the whole unordered list. As you will see, there are several ways to accomplish this, it will cover the new ways according to current HTML standards and some older more complex ways.

Now you will modify our cover page (index.html) to use the <center>...</center> tag on the list of lessons section. We will also make some other changes to improve its appearance.
NOTE: Look closely at the changes you just made. This whole section included within the unordered list tag is now enclosed by the <center>..</center> tags for alignment. Now take a close look at the alternate ways to emulate that same effect by removing the <ul><li>...<li>...</ul> structure and adding the <br> tags at the end of each line which will force a line break.
<i>You will now use the latter to center the title of each web page:
<h1> or <h2> tags, following this example from file intro.html: In lesson 8a you learned how to put images in your pages and saw that you could have one line of text align with the top, middle, or bottom of an image. However, up to now, you could not have a block of text sitting side by side with an inline image.
With the align attribute in the <img> tag we can specify to have the image itself aligned to the right or left margin of the page. But more so, we can have any HTML following it "fill" in around the empty space. The HTML to do this is:
Shrink and stretch your web browser window to see how it affects your page with aligned images/text.
One more note. There will be times when the text or other items that are aligned with the image are rather short and you want to force the next text to jump down below the image. There is an attribute for the <br> tag to clear the alignment:
That will "clear" (or disable) any preceding alignments set up in the <img> tags. We suggest that you always use these tags because the alignment will vary depending on the font specified in the reader's web browser and the width of their browser window.
Sometimes when you use the right or left alignment with an image, the text wraps a bit too close to the image. There is an option you can add to the <img> tags to add more padding or space around your image:
The vspace and hspace options put the amount of pixels specified of space above and below (vspace) or on the left and the right (hspace) of the image. You could modify your previous example to look like:
You will now return to our index.html page to re-format the opening screen and add another nice picture. The picture itself may look nice, but it will take more vertical space to have the picture seperate from the text below. We will use the image/text alignment to put some of the text adjacent to the image.
<blockquote> tag is not effective, so it is removed.
You may want to compare your HTML file to this sample of how it should look at this point.
We will add in one more alignment tag, the "divisions" tag <div>...</div> All text within the tag is justified according to the align attribute:
This will be one tag that you will be seeing alot of again when you transition to using CSS. This one tag has a very powerful function, as it delineates different sections that do not share similar attributes.<div align=left>...</div>
Note that the center attribute accomplishes the same effect as the <center>...</center> tag. You will now use this tag to make the opening quotation on our cover page have its text aligned to the right margin of the page:
As you will see later, there will be some similarities in how the subject of alignment will be addressed with CSS. Fundamentally it will do the same thing, the syntax and in some cases where it will be placed will be the only difference.
Compare your web page with this sample of how it should appear. If your pages are different from the sample or the hypertext links do not work correctly, review the text you entered in the text editor.
Try making some of your text centered- aligned or right margin aligned.