
After this lesson, you will be able to:
Let's see how with HTML you can include pictures like the "Big M" in a web page...
An "inline" image is one that appears within the text of a web page, such as  this picture of "Big M".
(make sure it is contained within any tags on that same sentence such as <p>..</p>)
where filename.gif is the name of a GIF file that resides in the images folder within your web folder that contains your HTML document. By "inline", this means that a web browser will display the image in between text.
NOTE: See how the text immediately follows the "Big M" above. What if we want the "Big M" sitting on a line by itself? To force the image to appear on a separate line, simply insert a paragraph tag before the image tag:<p><img src="filename.gif"></p>

NOTE: The text aligns only for one line... (shrink or stretch the width of your web browser window to see what happens.) In a later lesson, we will see a way to align blocks of text so that they flow around the side of an image.
You will also need to have the GIF image available from the Lesson 8. In this exercise, you will add an introductory picture of a car logo to your lesson.
NOTE: In this case you will place the image after the text, therefore you will insert the image at the end of the text but before the closing tag </h1>.
Another option you may want to include in your <img...> tags are two attributes that give the dimensions of the image in pixels. Why? Normally, your web browser has to determine these dimensions as it reads in the image; the loading of your page can be more efficient if you specify these numbers in your HTML.
The format for including this option is:
<img src="filename.gif" width=X height=Y >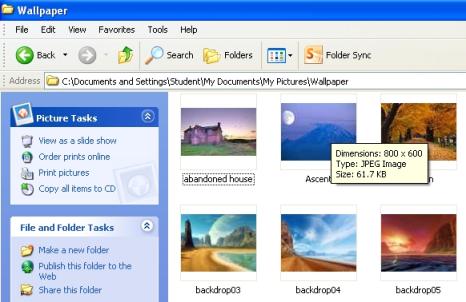 Another way to find the dimensions of an image is to load it into your web browser -- you may be able to drag and drop the icon for the image into your browser window - right click on the image, view the properties and the height and width will be displayed.
For our example in this lesson, the ferrari logo.gif image is 200 pixels wide and 200 pixels high, now you are going to reduce the size of the image so it does not overwhelm the text, then adjust the alignment so that it is centered with the text. Edit your cars.html file to read:
<img align=middle src="Ferrari%20logo.gif" width=50 height=50>Compare your work to this sample to see if you got it right. Often we are asked if you can alter the size of the image by inserting numbers other than the actual dimensions of the image. The answers is yes but the results may be undesirable. If you insert larger numbers (to make the image bigger) the result will be a "blocky" picture. Sometimes this can be a useful effect on images with large areas of solid color.
If you use lower numbers (to make the image smaller) the result may be a distorted picture. Also, the full size image still has to be downloaded, so there is no real savings in terms of time to download the image. Any re-sizing of the image requires extra "work" by the web browser to recalculate the page layout.
You can also specify the size of an inline image in dimensions that are percentages of the current browser window size, so that the image will resize itself if the viewer expands or reduces the size of their browser window. Here is one more thing to do. Let us add an image to the cars.html page to add a little flair because that little Ferrari logo just isn't going to cut it. First remove the little inline ferrari logo and then go to the images folder you copied to your own folder in the last lesson. Now add the image ferrari 458.png to you page as a header and center it. It needs to be placed on the next line after the <body> tag. Do not forget to use %20 in the filename!
Let's see if you got it right and compare your work to this sample of how this document should appear. If your document is different from the example, check how you entered the image format in your text editor. Make sure you entered it as instructed in this lesson. If you see a picture icon with a question mark, check that the HTML file and the image are in the same folder/directory. Then, you may want to make sure that the file name entered in the <img... > tag matches the name of the file.
NOTE: Some computer systems (UNIX) are case sensitive for the names of files, meaning that the file ferrari logo.GIF is NOT the same as Ferrari Logo.gif. Other computers (Macintosh) consider them as the same files. Even if your computer does not differentiate between capital and small case, we suggest that you be consistent in the naming of files and how they are referred to in your HTML and use all lower case letters. (Some web servers do run UNIX).
Add an inline image to your web page using a GIF picture file that is stored on your computer.
Relax... this lesson is quick and easy! In fact, it is just information for you to read...
The real power of the web is the ability to create hypertext links to related information. That other information may consist of web pages, graphics, sounds, digital movies, animations, software programs, content of a file server, a log-in session to a remote computer, a software archive, or an "ftp" site. The World Wide Web uses an addressing scheme known as URLs, or Uniform Resource Locators (sometimes also called "Universal Resource Locator"), to indicate the location of such items. These hypertext links, the ones usually underlined in blue, are known as anchors (This should not be news to you as you followed several to get this far!).
In the next lessons you will:Sound complicated? If you made it this far you'll be alright! That sounds like a lot to do! Don't worry -- it is no more complex than what you have done up to this point.
After all, without the hypertext/hyperlinks, we would be only calling this "Writing TML" and not Writing HTML
Now, you will take your first step of "anchoring" by creating a hypertext link to a second web page. These links are called "local" because they reside on the same computer as the working document (they do not have to venture out on the Internet). You will also be shuffling around the parts of your growing web site (do you see how this becomes more than just a "home page"?).
Think of it as "a" for anchor link and "href" for "hypertext reference".
The filename must be another HTML file. Whatever text occurs after the first > and before the closing </a> symbols will be the "hypertext" that appears underlined and "hyper."
Now follow these steps to build an anchor link in your HTML document to a local file:
NOTE: The text "Camaro" will link the viewer to a second HTML document called camaro.html. This second HTML file does not yet exist; we will construct it in steps (5) and (6).
In lesson 8a, you learned how to display an "inline" graphic that would appear in your web page. With the anchor tag, you can also create a link to display a graphic file. When the anchor link is selected, it will download the image file and display the image by itself in an empty page.
The simplest anchor link is to a file in the same directory/folder as the document that calls it. The format for creating a hypertext link to a graphic is the same as above for linking to another HTML document:
<a href="full filename.gif">text that responds to link</a>Now follow these steps to add a link to a graphic file in your HTML document:
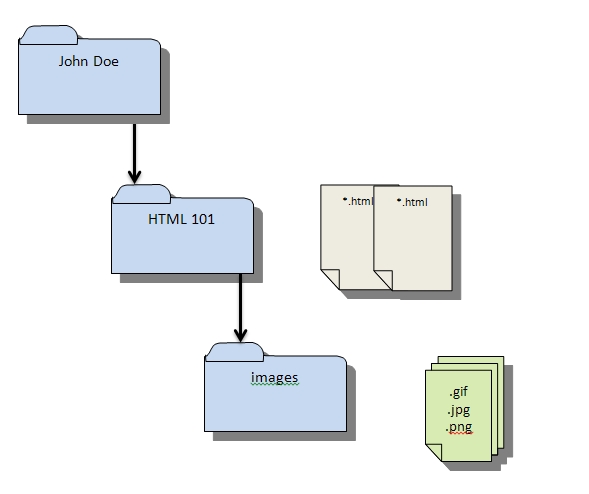
As we have already done, the anchor tags can link to an HTML document or graphic file in another directory/folder in relation to the document that contains the anchor. For example, in our previous lesson, we placed all of the graphics in a separate directory/folder called images. The purpose is to keep your files organized, especially after you create more and more HTML files. You will see that keeping the image files in their own area will make things a bit more organized for you.
NOTE: With HTML you can direct your web browser to open any document/graphic at a directory level lower (i.e. a sub-directory or folder within the directory/folder that contains the working HTML file) by using the "/" character to indicate the change to a sub-directory called "images" in your work area.
The types of links you have constructed here are known as "relative" links, meaning a web browser can construct the full URL based upon the current location of the HTML page and the link information in the <a href=...> tags. This is very powerful because you can build all your web pages on one computer, test them, and move them to another computer -- all the relative links will stay intact.
In this lesson we saw how to construct a hyperlink to a document that is stored in a directory lower than the working HTML page.NOTE: You can also construct a link that connects to a higher level directory as well by using this HTML:<a href="../../home.html">return to home</a>
Each instance of "../" the URL of an anchor link tells the web browser to go to a higher level directory/folder relative to the current page; in this case to go up two directory/folder levels and look for a file called home.html. In our example, let's say that our pictures sub directory was not in the same directory/folder as the cars.html file but was actually one level higher. In the previous section we constructed a link from the camaro.html file to the camaro.jpg file in a subdirectory:
<img src="images/camaro.jpg">An advantage of this structure is that it would be easier to store a large number of graphics in this upper folder/directory that can be shared with other web pages not stored in this directory.
This last small step may not be obvious, but we will explain it shortly. The last thing you should do in this lesson is to change the name of your working file from cars.html to index.html. You should do this using the normal way of editing a file's name from the computer desktop (on the Macintosh click on the file name; on Windows right-mouse click on the icon/filename and select the option for Rename). Note that for Windows users that if you use a special editor program to create HTML files or if the "do not display extension for known file types" option is selected in Windows, you will not see the ".html" extension on the desktop file name, so in that case, you would change the file name from cars to index because under the hood, the computer knows that there is an ".html" at the end.
Why are you doing this? Let's say you have finished this lesson and are ready to store it on a World Wide Web server for the world to see. And let's assume that you own the domain name "Favorite Cars.com" and your files are stored on a server at "Go Daddy.com". Therefore your url will be:
http://www.Favorite Cars.com/ (which will actually forward the visitor to the internal address at "Go Daddy.com) ...and your file will be stored in a series of directories:
--= top level of server =--so that the URL for the Favorite Cars Web site would be:
http://www.Favorite Cars.com/information/automobiles/cars.htmlPretty long, eh? Now here is the promised explanation -- on most WWW servers you can designate one standard name that is the "default" web page for that directory and on most systems that name is.... index.html. What this means is that the Internet address:
http://www.Favorite Cars.com/information/automobiles/is equivalent to
http://www.Favorite Cars.com/information/automobiles/index.htmlThis might make you think that it is a lot of energy to cut 10 letters out of a URL! But it does tend to make your URL look a bit more professional -- If you were creating the Longhorn Cheese Home page,
http://www.Longhorn Cheese.com/looks less redundant in print than
http://www.Longhorn Cheese.com/cheese.htmlthis comes into play when people read about your URL and are trying to connect by typing it into their web browser. By using the index.html file name, you are controlling the way they see your site by automatically loading the homepage you wish for them to see. Technically, you would be able to just type Longhorn Chees.com into your address bar and the web would direct you straight to the index.html file of that site.
NOTE: This special file name index.html and in some cases home.html are both used on most web servers -- check with the people that run your web server.
Compare your web page with the sample of how this document should appear. You will first see your "cars " Web page. When you click on the hypertext for the Camaro, your web browser will display a new page. Finally, when you click on the hyperlink on this page, your web browser will display in an external window a picture file that is stored in a sub folder/directory.
Use the web browser's back button twice to return to the "cars" page. If your web page was different from the sample, review the text you entered in the text editor.
Create a second HTML document that uses the HTML formatting that you are familiar with at this point. Return to the first one you created and make an anchor that links to this new one.
It's time to understand how to link to World Wide Web using the web's addressing scheme.
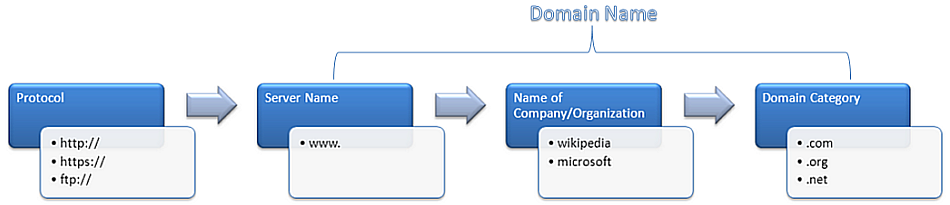
The Uniform Resource Locator (URL) is what the World Wide Web uses to find the location of files and documents from computers on the Internet. On your web browser screen, the URL for a document is typically displayed in the upper part of the Web browser window where the address bar usually resides. The URL includes:
A URL is just a way to generalize the kinds of resources that you can request through a web browser. A web page is one kind of resource, an image is another, and a video is yet another. Most of the time, a hyperlink reference will only refer to web pages. All URLs, including those that specify web page addresses, can be written in three distinct ways.
Each of these ways is a valid value for the "href" attribute. The most complete form of a web page address is called a fully qualified URL. Fully qualified URLs are so named because they are composed of all three pieces of a URL: the scheme (also called the protocol), the domain name (also called the host name), and the path. In the example link to Wikipedia in the previous section, the scheme was http: , the domain name was //wikipedia.org, and the path was the trailing / (which means "the home page").
Some parts of URLs are considered optional, which means that if they are omitted, they're filled in according to the current context. For instance, in fully qualified URLs, the scheme portion is optional and is filled in with whatever scheme the current page uses. So if your web page, like most of the web pages out there, uses the http: scheme and you link to Wikipedia, and then http://wikipedia.org/ and //wikipedia.org/ are identical. On the other hand, if your web page uses the https: scheme, then a link to //wikipedia.org/ will end up linking to https://wikipedia.org/ instead.
If the URL is to the main level of this host (its "home page"), then the URL is terminated with a slash "/". If you are linking to a sub-directory or a file, you must also add the exact path to that item using the slash character to indicate the entire file path.
NOTE: For most web servers spelling does count! So does capitalization! File names on UNIX computers are case sensitive, meaning that a file named SpiffyText.html is a different file than spiffytext.html.
The most verbose form of a web page address is called a fully qualified URL. Fully qualified URLs are so named because they are composed of all three pieces of a URL: the scheme (also called the protocol), the domain name (also called the host name), and the path. In the example link to Wikipedia in the previous section, the scheme was http:, the domain name was //wikipedia.org, and the path was the trailing / (which means "the home page").
Note that URLs can link to any site, directory, subdirectory, text file, image, digital movie, or sound file on any Internet site that is set up for public access. The best way to see different URLs is just to move your mouse over any hypertext link in any web page -- if you look at the bottom of your web browser, it should display the URL that you would connect to if you clicked on that link. Unfortunately you will not be able to experience this first hand since there still is no internet connection available. Fortunately though, these tasks can be experienced with any hypertext links.
Here is an easy way to copy a URL for a link in any page. You first must access the "secret" pop-up menu from any hypertext link in a web page -- click and hold the mouse for Macintosh; click the right mouse button for Windows and Unix. From this menu, select Copy Shortcut (IE8). After releasing the mouse button, jump to any text document and select Paste from the Edit menu. Voilà! You've just nabbed a URL from a link in the web page (this way, you can copy a URL without even visiting the page it links to!)
Find some hyperlinks on the F&CBP site, for each one, record its name and its URL displayed at the bottom left of your browser window (IE8). See if you can copy and paste the URLs into a text document. You will use this list later to add links from your own web pages to these sites that you found.
You've been revving your engines, and itching to hit the Information Super Highway, right? Well, obviously there still is no internet connection yet. Fortunately for you though, the mechanics of this exercise is identical to what you have already done earlier. Therefore, this will be a very short lesson.
After this lesson you will be able to:
Where URL is the full Uniform Resource Locator, in quotes, the address for the Internet site where you want to send the viewer. The string Text to Activate Link is what will show up as hypertext in your web browser (usually but not always) underlined and in blue. When a viewer clicks on this hypertext, the web browser will link them to the Internet site indicated by the URL. Remember that a URL can be a link to another World Wide Web (WWW) server, FTP site, or any text, graphic, sound, video file on these servers.
NOTE: You have been shown you how to link directly to an image from another web server. You could quite easily use an off-site URL in your img tags for your own web pages. It is highly recommended that you to contact the site's creator and ask permission before creating the link with an e-mail request. In some cases, web site owners may be concerned about the extra traffic which could cause penalties for excessive accesses or any other complications that may arise.
As you navigate among different web pages, the URL of the currently visible page can be viewed at the top of the web browser in the address bar. You can use your mouse to select and copy a URL from the web browser display and then paste it in the anchor tag of your HTML document. This is much more efficient than writing URLs down on paper (some can get quite long!).