
One of the key techniques used in modern web page design techniques is something called the separation of presentation and content. In the early days of the web, there was no way to do this, which meant that HTML pages were bloated, repetitive and difficult to understand. For example, if you wanted the main body text of the site to use the Verdana typeface, in a size of 12 pt., every single paragraph of text would need to start with a
<font face=verdana size=12pt>
tag. That could amount to hundreds or thousands of such tags across the entire site. If you subsequently wanted to redesign the site, changing all those tags was a lot of work.
A few years ago, along came a new revision of the HTML language (and a new generation of web browsers that were capable of displaying pages created with it). Top of the list of new features was something called CSS, or Cascading Style Sheets, or HTML Style Sheets.
A style sheet is a separate file that complements one, some, or all of the HTML pages on your site. It contains all the information about how the text, pictures and layout of your pages actually looks. So, to update the above example, there might be a section in the CSS file which states that all instances of the <p> tag should use the Verdana typeface in a 12pt size. Now, all the pages of your site merely need to surround the paragraphs with nothing more than a <p> tag and they'll all magically appear in the correct typeface and size. The best thing about it though is that you can tweak the appearance of every paragraph in your entire site just by changing one entry in a single CSS file, rather than having to change any <font> tags.
CSS has other benefits too. When you specify which CSS file is to be used to format your page, you can actually specify different CSS files for different situations. For example, one set of styles for when the page is viewed on screen and a different set for when the user prints the page on their printer. And yet another set for when someone views the page on a smartphone or a standard (4:3) screen or even a wide screen format (16:9).
As far as accessibility, and making your site disability-friendly, CSS can help here too. You can set up a separate style sheet for people who have basic sight problems or dyslexia, i.e. large text, no graphics, and a more readable background color. You can then easily add an option to your site that uses this style sheet rather than the normal one, for those visitors who prefer it. And all, of course, without having to maintain separate copies of the page content, because this is now separate from the presentation side of things.
The ability to separate presentation and content has other benefits too. Creating good web sites requires skills in both writing and design. CSS means that one person can concentrate on writing the content for the site, while someone else can work their magic on the style sheets.
You can apply CSS rules to page elements in three ways. You can embed a CSS rule directly into an element, you can embed a whole style sheet inside the HTML or XHTML page itself, or you can link a stylesheet from an entirely separate file to your HTML or XHTML page. Let's examine all three possibilities in detail.
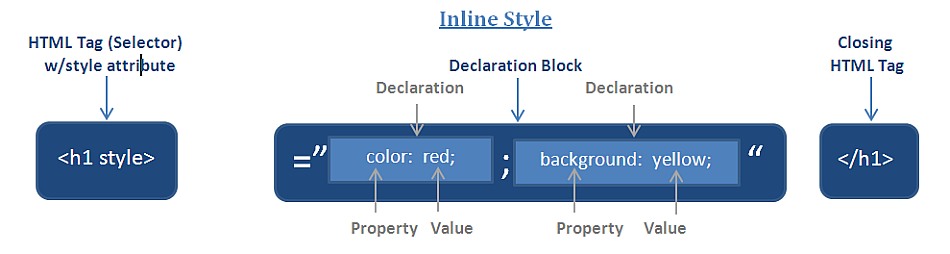
For a newcomer unaccustomed to CSS, the simplest and most effective way of applying CSS styles to web page elements would be through the use of inline styles, or styles written directly into the element. Since an inline style by definition applies only to the element in which it is placed, there is no need to use a CSS selector in the rule, and since the style is already enclosed inside the element, a declaration block's curly braces aren't needed either. All you need to specify for an inline style to work is the property and value you want to set on the element.
For cases where you want to simply assign a few styles to one individual element, without the need for embedded or external style sheets, employ the HTML attribute style to set an inline style:
The style attribute is fairly new to HTML, and it can be associated with any HTML tag whatsoever, except for those tags that are found outside of body (head or title, for instance).
The syntax of a style attribute is fairly ordinary. In fact, it looks very much like the declarations found in the style container, except here the curly braces are replaced by double quotation marks. So <p style="color: maroon; background: yellow;"> will set the text color to be maroon and the background to be yellow for that paragraph only. No other part of the document will be affected by this declaration.
NOTE: that you can only place a declaration block, not an entire style sheet, inside an inline style attribute. Therefore, you can't put an @import into a style attribute, nor can you include any complete rules. The only thing you can put into the value of a style attribute is what might go between the curly braces of a rule.
Use of the style attribute is not generally recommended. Indeed, it is marked as deprecated by XHTML 1.1 and is very unlikely to appear in XML languages other than XHTML. Some of the primary advantages of CSS, of which one is the ability to organize centralized styles that control an entire document's appearance or the appearance of all documents on a web server, are negated when you place styles into a style attribute. In many ways, inline styles are not much better than the font tag, although they do have a good deal more flexibility.
Naturally, inline styles don't give you much flexibility since they can't use the power of CSS selectors to target multiple elements of the same type on a page as your previous examples have done. Worse, inline styles embed presentational information directly into your document, which is exactly what CSS was developed to avoid. In general practice, inline styles really aren't a good solution for applying styles to elements.
Nevertheless, there are some cases where inline styles are useful. For instance, they make it easy to experiment with particular elements and to test what different values of different properties will do to an element. While you're learning about what CSS properties exist and what they can do, feel free to use inline styles to try them. In an actual project deliverable, however, you shouldn't leave any presentational data inside your markup, so you should pull these inline styles out and place them in either embedded style sheets or external style sheets.
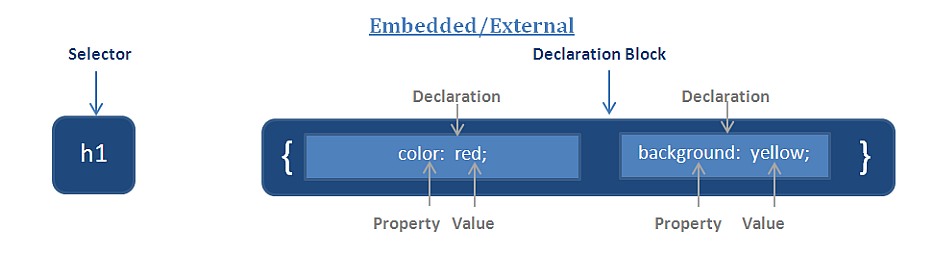
Embedding a CSS style sheet inside an HTML or XHTML file enables you to use every feature of CSS without limitation, but only with the single document that contains the embedded style sheet. By placing CSS rules in a <style> element, you're effectively creating a small area inside your markup where you can safely put CSS rules. When the browser encounters this special area, it stops interpreting your source code as HTML markup and begins to interpret the code as CSS rules. See how this might work in practice.
For example a sample web page for Papa Pepperoncini's Pizza, you have an HTML document shell that looks like this:
<html> element: <head> and <body>.
The <body> is where your XHTML content goes. The <head>, you might remember, is where the majority of the metadata about your document goes. Since CSS defines the presentation of content, it's considered a form of this metadata, and you need to place it inside the <head> element. You do this by defining a <style> element (also referred to as style blocks)and giving this element a type of text/css to specify to the browser what style language the content of the element contains. For CSS, you will always use the text/css type.
The document shell with an embedded style sheet would then look like this:<h1> element earlier into two style sheets with one CSS rule each:Placing CSS rules inside embedded style sheets in this manner clearly gives you more flexibility regarding what you'd like your CSS rules to accomplish, but it's still limited to applying the rules to a single page. The greatest benefits of CSS can be seen when you use a single style sheet to define the presentation not of a single web page but of an entire website that may have 10, 20, 100, 1,000, or more individual pages.
To accomplish this feat, you must completely separate the CSS styling from the HTML or XHTML markup by placing it into a separate file.
The most common-and most efficient-way to apply CSS to a web page and indeed to an entire website is via the use of entirely separate files that are linked to a web page with a special reference element, much like the way the <img> element references an external image file. These separate files with CSS rules in them are called external style sheets, because they are placed outside of any containing markup. Even though these CSS rules are separated from the actual web page document, they still behave the same way as if they were written in an embedded style sheet.
To reference an external style sheet from an HTML or XHTML page, you use the <link> element to-you guessed it-link your CSS file to your markup. Since you can link many different kinds of things into a web page, the link needs to be of a certain relationship, specifically, a style sheet relationship. This is specified in the rel attribute. Like an <img> element, you also need to tell the browser where to find this external style sheet. You can do this with the href attribute, and as you have probably already guessed, its value is any valid URL. Finally, just like an embedded style sheet, you need to tell the browser that this style sheet is written in CSS, so you specify a type of text/css. All together, the <link> element might look like this:
This (empty) element specifies that an external CSS style sheet can be found inside the css folder and that its file name is basic.css. Inside the basic.css file, you simply write CSS rules as you normally would. Since this entire file is going to be interpreted by the browser as CSS, there's no need to enclose the CSS rules within a <style> element.
Web pages can be linked to any number of external style sheets. There's really no technical limit, although in practice the more CSS files you link to, the longer it will take for your browser to go and fetch all of them. Of course, the benefit of an external style sheet is that more than one web page can be linked to it, which means you can reuse the style rules you write for one web page across an unlimited number of other web pages. This is what makes CSS so outrageously scalable. It doesn't matter whether your site has one page or one million pages; as long as these pages have the basic elements that need to be styled in the same way, a single CSS file can be used to style them all.
For example, if a navigation menu for a website has four links in it:Each of these four pages will contain the same navigation menu, marked up in the same way. Thanks to this consistency and thanks to CSS's ability to create one set of rules that can be reused across any number of pages, you can write a set of rules that will style these links in any way you want, and then, merely by linking each of these four pages to the same external style sheet, the navigation menu's links on all of the pages will look the same.
Let's give each of the four links a nice teal color. Since these links are obviously a navigational element, let's also remove the underline from each of them. Finally, since you want them to stand out a little bit more prominently on your page, let's make them just a touch bigger than normal text. You can accomplish all of this with a single CSS rule that includes just three declarations:
All you need to do is place this CSS rule into the basic.css file in your designated CSS folder and then link each web page you create to this external style sheet using the <link> element. As long as your markup remains consistent on all the pages you create for Papa Pepperoncini's Pizza restaurant website, the style rules you've just written for the main navigation will automatically be applied.
This method is obviously much better than having to write (or copy and paste) the same set of stylistic information to each of the four pages because it's faster to implement. It's also easier to maintain. Let's say that after you show Papa Pepperoncini your design concepts, he tells you that he thinks the navigation menu is too small. He wants to make all the navigation links across the entire site even bigger than they are. Since you've managed to successfully separate the main navigation links themselves from the visual style you've given them, this update isn't a problem. To accommodate Papa Pepperoncini's request, all you need to do is open your basic.css file and change your CSS rule, perhaps to something like this:
Now, any web page that you've previously linked to this style sheet is instantly updated, just like that. But hold on, what is this ul a selector? Surely there's no ul a element, you might be saying to yourself, and of course (since element names in HTML or XHTML cannot contain spaces) you'd be correct. In fact, this is a new kind of CSS selector, one that targets anchors only when they are nested inside an unordered list. To be even more specific and target the list items within the unordered list, look at this example:
| CSS Selector | Action |
|---|---|
| li a | targets list item anchor |
| li a:active | targets list item anchor that are active (the page currently selected) |
| li a:hover | targets list item anchor that the mouse is hovering on |
In order to understand the concept of rules in more detail, let's break down the structure. Each rule has two fundamental parts, the selector and the declaration block. The declaration block is composed of one or more declarations, and each declaration is a pairing of a property and a value. Every style sheet is made up of a series of rules. The following example shows the parts of a rule.
NOTE: There is no defined way that decleration blocks need to be written, short of following the designated syntax. Take a look at how the decleration is written in the above example. That is a good example to follow. There are definite delineations for the element, attributes and values. If this was part of a style sheet, it would be easy to pick out individual elements. Take a look at this example of a poorly written stylesheet and compare it to this well formed example.
The selector, shown on the left side of the rule, defines which piece of the document will be affected. In this case the h1 elements are selected. If the selector were p, then all p (paragraph) elements would be selected.
The right side of the rule contains the declaration block, which is made up of one or more declarations. Each declaration is a combination of a CSS property and a value of that property. The declaration block contains two declarations. The first states that this rule will cause parts of the document to have a color of red, and the second states that part of the document will have a background of yellow.
The best way to demonstrate the power of stylesheets is to show you what sort of an influence it can have on the project you have been working on throughout this class. As you examine the provided example, you will notice that it will give you access to visual presentation elements that you could not create before without going through many changes. Notice the level of interactivity as you hover the mouse over navigation elements and links.
The "CSS Pocket Guide" is a must read for anyone trying to learn CSS. It comprehensively covers many of the relevant topics concerning CSS, including some of the latest styling tools and techniques. It is highly recommended to anyone wanting to learn CSS, to spend time with this book.
JavaScript is one of the three basic building blocks of the Web. If you think about web technologies as a pyramid, HTML/XHTML is one corner of that pyramid handling the actual content of a page. CSS is another corner, adding style to your pages and allowing you to lay them out in a way that is not only attractive but also adds visual impact. JavaScript is the third corner, allowing pages to do more than just be static documents. Here is an example of what some fancy JavaScript can add to your page.
One of the biggest questions amongst those who are new to the Web is what's the difference between JavaScript and something like PHP? The big difference is that JavaScript is executed on the client side (in the visitors' browsers), whereas PHP runs on the server. So in other words, JavaScript actually makes use of the processor(s) on your end users' computers.
The advantage you get is that things seem to happen instantly in the browser. Using JavaScript, you can make your pages feel more like an application running on the clients' computers. JavaScript operations don't require a round-trip to the server and back; pages aren't submitted, processed, and then returned.
This speed comes with a price, though. Because you're not processing on the server, you don't have access to certain features. You can't, for example, save something to or get something out of a database management system on a remote host using JavaScript. It would be impossible to write a real-time chat application using JavaScript alone, for example. You can't manipulate files or send and receive e-mail. And individuals have the option to turn JavaScript off in their web browser, meaning you can't do anything with JavaScript at all (so you'd best have a backup plan). You can do some pretty cool things, though, for those people who will let you.
JavaScript came about as a joint effort between Netscape Communications Corporation and Sun Microsystems, Inc. The news release of the new language came on December 4, 1995, back when Netscape Navigator 2.0 was still in its beta version. JavaScript version 1.0 became available with the new browser. (Before its release as JavaScript, it was called LiveScript.) JavaScript is an object-based, client-side scripting language that you can use to make Web pages more dynamic. To make sense of such a definition, let's look at its important parts one by one.
Object based means that JavaScript can use items called objects. However, the objects are not class based (meaning no distinction is made between a class and an instance); instead, they are just general objects. You don't need to understand them in any detail until you know a few other features of the language.
One of the biggest questions amongst those who are new to the Web is what's the difference between JavaScript and something like PHP? The big difference is that JavaScript is executed on the client side (in the visitors' browsers), whereas PHP runs on the server. So in other words, JavaScript actually makes use of the processor(s) on your end users' computers.
The advantage you get is that things seem to happen instantly in the browser. Using JavaScript, you can make your pages feel more like an application running on the clients' computers. JavaScript operations don't require a round-trip to the server and back; pages aren't submitted, processed, and then returned.
This speed comes with a price, though. Because you're not processing on the server, you don't have access to certain features. You can't, for example, save something to or get something out of a database management system on a remote host using JavaScript. It would be impossible to write a real-time chat application using JavaScript alone, for example. You can't manipulate files or send and receive e-mail. And individuals have the option to turn JavaScript off in their web browser, meaning you can't do anything with JavaScript at all (so you'd best have a backup plan). You can do some pretty cool things, though, for those people who will let you.
Client side means that JavaScript runs in the client (software) that the viewer is using, rather than on the Web server of the site serving the page. In this case, the client would be a Web browser.
A client-side language is run directly through the client being used by the viewer. In the case of JavaScript, the client is a Web browser. Therefore, JavaScript is run directly in the Web browser and doesn't need to go through the extra step of sending and retrieving information from the Web server. With a client-side language, the browser reads and interprets the code, and the results can be given to the viewer without getting information from the server first. This process can make certain tasks run more quickly. A client-side language can also access special features of a browser window that may not be accessible with a server-side language. However, a client-side language lacks the ability to save files or updates to files on a Web server like a server-side language can. A client-side language is useful for tasks that deal with parts of the browser or that allow information to be validated before it is sent to a server-side program or script. For instance, JavaScript can open a new window with specific dimensions, specific features (such as a location bar or status bar), and a specific point of placement on the screen. JavaScript can also be used to check the information entered into a form before the form is sent to a server-side program to be processed. This information check can prevent strain on the Web server by preventing submissions with inaccurate or incomplete information. Rather than running the program on the server until the information is correct, that data can be sent to the server just once with correct information.
A scripting language doesn't require a program to be compiled before it is run. All the interpretation is done on-the-fly by the client.
With a regular programming language, before you can run a program you have written, you must compile it using a special compiler to be sure there are no syntax errors. With a scripting language, the code is interpreted as it is loaded in the client. Thus, you can test the results of your code more quickly. However, errors won't be caught before the script is run and could cause problems with the client if it can't handle the errors well. In the case of JavaScript, the error handling is up to the browser being used by the viewer.
Congratulations! You have covered a lot of material in this short period of time. Please keep in mind that this was a basic introduction to HTML. In order to realize the full potential of what can be done as far as creating a web presence, you will have to continue your studies. Do not let that disappoint you, because if you enjoyed yourself while doing this tutorial, then it is likely that you already have the bug and will continue to enjoy more studying. The goal was to make this tutorial as interesting as possible by creating an actual project to work along with. You will find that most material out in the free world will be interactive such as this. It has been scientifically proven that a person will learn a lot more efficiently and keep focused if the lessons include interaction, intermediate steps, results, reinforcement and reviews.
Now that you have a basic understanding of HTML it needs to be supported by knowledge of the latest HTML standards, which currently is at HTML 5. Once that is accomplished, Cascading Style Sheets (CSS) should be the next topic of study. It is challenging because there is an exhaustive amount of information available on the subject. It shares similarities with HTML because it is written in plain text and can be done on any simple text editor. The challenging part is that the context is different but shares enough similarities with attributes and values that at first it will seem confusing. The biggest challenge comes in understanding that HTML, the way it was used, tried to address both the content and presentation of a web page. Now only the content is in HTML, while the presentation design is done with CSS. This will now allow you to unleash the full potential of actual web design.