
"Add a TARGET to your href"
or"How to Make HyperLinks that Do Not Leave Your Site Behind"
For all of the pages you've worked on so far, you have written documents that have hyperlinks, so that when clicking the hyperlink loads a new web page, replacing the one that was there. Yes, a viewer can return to a web page using the browser's back buttons or the Go / History features.
But perhaps there is an application where you might wish a link to open the new content in a second browser window, leaving the originating window intact. One case where you might do that is where the first page contains a list of links to say 50 different photographs or definitions in a glossary, It might be handier if the list of links were to remain in view so the users can click a link, view the content, and easily return to the list of choices to select another item. Or perhaps the first page is part of an educational lesson where the students must visit 5 different web sites and answer questions about each one-- it would help them remember the assignment if the starting page remained in view.
In this lesson you will see how to modify the <a href=...> tag to specify that the link be loaded in a new browser window. Before you begin, there are issues to consider. If your web pages open up too many different web browser windows, it may be confusing to the viewer which one they started with. Also, on some computers, the new browser window completely obscures other ones, so they may not even know that it is a new browser window. So use this feature when it makes the most sense for the content.
The HTML code we use to specify a target browser (the window to display the content in) looks like:
<a href="some_url.html" target="window_name">Where as we know from earlier lessons "href"(hyperlink reference indicates the URL, either a web address or another one of our own web pages. The new part of the tag is the name you provide for target=. You can provide any name for the target; it is an internal identifier for the web browser. What happens when you click a link like:
<a href="http://www.mcli.dist.maricopa.edu/tut/likethis.html" target="tutorial">...is that your browser is saying, "Hmmm. I must go fetch the HTML for the URL http://www.mcli.dist.maricopa.edu/tut/likethis.html, and place it in a window named tutorial. Ahhh, I do not have any such window, so I will create a new one."
Here are four names that have a special meaning:It is suggested that you use short but descriptive window names.
You will now use this new code in your Favorite Cars lesson. From your previous work, one of the pages you created described the 1969 Camaro ZL1 and contained a hypertext link, that when it was clicked, linked to a large image. You will now adjust the HTML so that the large image opens in a new browser window.
Now, the link from the hypertext link should load the large JPEG image in a new browser window. Compare the result to this sample. Now you will learn a way to set the TARGET attribute so that the link is forced to open in a new browser window and be in front... by using the special window target name "_blank". The disadvantage with this approach is that if you have 20 links with this window target name, it is possible to then have your single web page spawn 20 different browser windows. Because additional browser windows require more computer memory, this might be a recipe for a computer crash!
As you can see this could get pretty complex and in order to fully explain this portion you would have to create a multi-layered website scenarios to see it work under the different circumstances that these tags are made for.
In your own web page, look for places where it would make sense to open new browser windows. Experiment with adding the target= tag to some of your links. Does it make sense to other people? Do they understand what has happened?
The upcoming lessons will cover a lot material that will require you to pay close attention. In the next two lessons you will learn how to create web page forms. What are forms? You have almost certainly seen and used them on other web sites.
Forms are used to add another level of interactivity to your web pages, to allow communication between your viewers and your web site, to gather information, and to offer different means of navigation.
The role of a form is to gather different kinds of user input and organize it in a uniform way so that all information is collected in the same format, i.e. fields to type in text, menus to select items from, radio buttons to choose items. The web browser takes this information, and wraps it up into a packaged format that can be sent directly to a web server, where there is a customized program sitting and waiting for the form information. These programs can unpackage the information, manipulate it, store data, and send a feedback page back to the viewer.
In the next lesson, you will learn how to write the HTML to display different form elements.
In this lesson you will be introduced to the basic web form elements that you might use in your pages. A web page form is defined by a set of <form>...</form> tags where everything in between includes HTML to code the different text fields, buttons, and drop down menus that are used to store selections from the page viewer. You can also have other HTML code inside the form that serve as labels for your form elements.
As an example, look at the source HTML used for the Writing HTML Alumni page. This page includes several different form elements for inputting text. The page layout is defined by using tables to arrange the form elements. The HTML on that page form includes different input elements that as well as the table tags that define their layout. The bare bones format for writing a form is:
You will learn more in the next lesson about the meaning of the options in the <form> tag. For now think of the value for ACTION=... as something that tells the browser the location of a script or program that will process the data sent by the browser via the selections in the form. The two values for METHOD=..., POST or GET define one of two ways the data from the form is sent to the program that will process the data.
Now you will review the different form elements you can use. All of the elements inside the <form> tags can send some information about their contents and whether or not they have been activated by the web page viewer. Each element includes a defined "type" plus a unique identifying name for that element. When the form data is sent to the web server, each element sends its name and its current state or value.
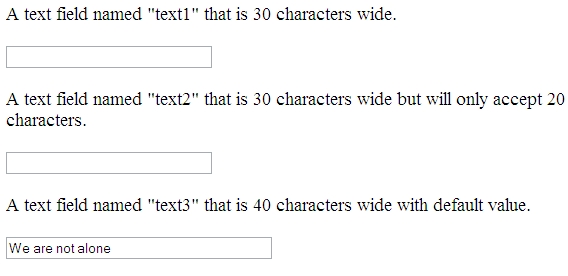
...are used to create one line fields that viewers can type text. The default width is 20 characters, and you can create fields of other sizes by the value in the size option. You can limit the number of characters by the value of the MAXLENGTH option. Text input fields will be empty when the page loads, unless you provide an initial text string for its VALUE option.
Hopefully you remember how to access the source code of a web page while viewing it in the browser. Using that option will be the simplest way for you to scrutinize the following examples.
View the sample and take a close look at the difference in the source code between the different sizes of text fields.
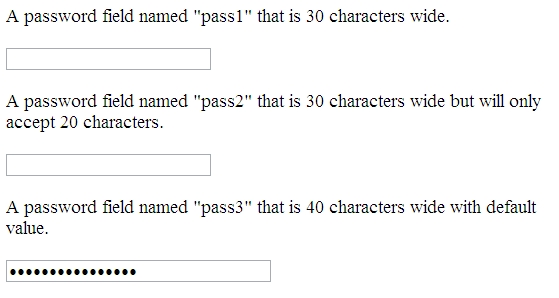
View the sample and take a close look at the difference in the source code between the different sizes of password fields.
...are text fields that have more than one line and can scroll as the viewer enters more text. The tag options define the size of the field by the number of rows and character columns. By adding the option WRAP=VIRTUAL, the text entered will automatically wrap at the right hand side of the field. You can also include default text to appear in the field.
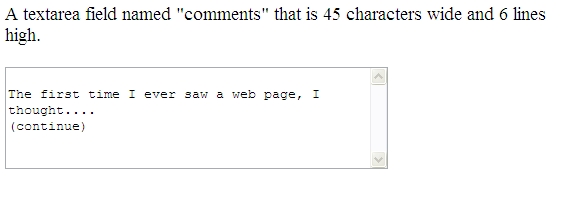
NOTE: What you will notice is that if you are viewing the sample in the "Firefox" browser, the set "45 characters wide and 6 lines high" formatting will give way to the option of being able to drag the text box's bottom right corner and expanding it to whatever size you want.
...are sets of buttons that are linked so that only one among button in each sets is selected at a time; if you click one button, the others in the set are automatically de-selected. A set of radio buttons is defined by providing them the same name. The value sent in the web form is the value of the radio button that was last selected. Adding the option CHECKED to one of the buttons in a set will make that button highlighted when the page loads.
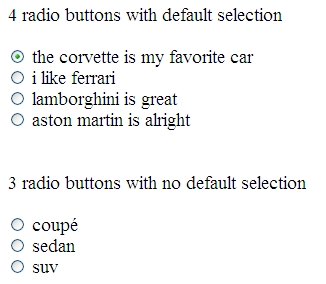
NOTE: See how the two sets of radio buttons, one named "car" and the other named "body" operate independently from each other.
...are similar to radio buttons, but are not affected by other buttons, so you can have more than one in a group checked at a time. Note that every checkbox has a unique name. If there is no check in the box, clicking it will place an X or a check mark there. If the box is checked, clicking it again will remove the mark. The value sent in the web form is the value of the checkbox if it was selected; otherwise the value will be empty. Adding the option CHECKED to one of the buttons in a set will make that button highlighted when the page loads.

NOTE: See how the two sets of check boxes, one named "foodx" and the other named "spreadx" operate independently from each and allow multiple selections within each set.

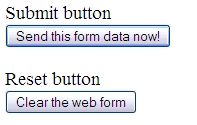
...creates buttons on the form. The Submit button tells the web browser to gather up all the selections, values, and entered text in the form elements and send it off to the place defined in the ACTION part of the form tag. The Reset button restores the form to its default state, how it looked when the viewer first entered the page. The VALUE option defines the text string that is placed on these buttons.
You will now create a web page form that uses all of these elements. This is going to be an additional feature of your Favorite Cars Web project. The purpose of the form is to provide a place for people who are working on this project to submit their reports. You could use this in several ways; it could send the reports as an email to the instructor, it could write the report data to a file on the web server, or it could generate a formatted web page report for the student which they could then print. There are other things you could do with data sent by a web form and this is but one example.
NOTE: You have created a 2-column cell for the text "student information" followed by three table rows that contain text input form fields. You have put the labels for the field in the first column of each row, right aligned. You also provided brief instructions in small, blue text below each form element. (Note how each form element has a unique name) The third form field is actually a password type to shield the code name the user will type in.
NOTE: Be sure to compare the format of radio buttons versus check boxes; each radio button in a set has the same name while all of the check boxes have different names.
Experiment with writing web page form elements to your own web pages. How would you create a web page that has more than one form on it?